This Blog is not fully developed.Visit again. Thank you

This Blog is not fully developed.Visit again. Thank you


Translate it

Welcome visitor! Please wait till blog loads...

Sunday, December 22, 2013

Get Skype's Premium Account Free for 12 Months

Skype is a free and open platform owned by Microsoft that allows you to make free voice and video calls to people all over the world. Well they do not have any limitation unless you are making calls to more then one person. If you have a larger group then you might face some problem as skype has implemented a large group restriction and if you want to make video calls to whole group then you cannot unless you get there premium account, but yes they even come up with many promotional offers that simply allow you to grab there premium account for free.


NOTE Now with this free premium account you get free group video call, free group video sharing, no advertising and you even get full customer support. Now you are allowed to make free group video calling between 10 people at a time.Well earlier I posted many different ways of getting free premium account but all those ways get dug by time, so today we have another great promotional offer that will allow you to get free premium account for skype that too for 12 months straight.

  1. Visit Skype Collaboration Project Page.
  2. Now just scroll down and enter your email address and press SEND.
  3. Now you will receive your free voucher code within few hours.
  4. Just open your email and copy that voucher code.
  5. Now visit Skype Voucher Redeeming Pageand Sign-In with your account.
  6. Now enter your voucher code you received in your email and then press Redeem.
  7. That's it now your account will be eligible for that free promotional offer.
NOTE Well now this offer will not last forever, make sure you redeem your code before 30th April 2014 as that's the deadline for this offer. Well hope you will enjoy this awesome offer by skype, so do like and share this post enjoy.

Saturday, November 9, 2013

Protect your Facebook Images using DMCA Watermarking

Online theft has just increased and people are using pre owned copyright content in order to spread spam and even harm the personal copyrights, well we have already discussed how you can easily protect yourBlogger content Theft using some javascript and css tricks well now if you want to protect your facebook images from getting stolen or shared among another group of filthy teenagers then we have an awesome facebook images protection tutorial that you will love and it will for sure protect all your images.

DMCA Watermark your Facebook Albums

Well now using this DMCA protection you can easily watermark your whole facebook album with the DMCA logo, well you even have the personal logo uploading option but that option is only available in the PRO version. So if you are not willing to pay for the PRO version then you can still protect your images using the free version.
  1. Register your free account on Facebook DMCA Watermark.
  2. Now after successful registration make sure to verify using your email.
  3. Now after verifying your account you need to login to your Facebook DMCA Watermarking account to start watermark process.
  4. Now you will see the option to select the Facebook Album in which you want all the images to be watermarked.
  5. Now just press "Watermark this Album" and it will automatically watermark whole album and every images in it.
  6. Now your original album will not get affected but it will create a new album, so now you just need to change the privacy settings of your original album to Only Me and your new watermarked album is ready to be shared with the world.

So guys as you can see how easy it is to protect your facebook albums from getting shared with the works using this bulk DMCA Watermarking solution, well now easily watermark all your images and stop online theft.

Check if Pen Drive or Memory Card is Original or Fake

Well this little tool can workout really good for you in analyzing your pen drive or memory card and giving you exact results if its space is fake or not. So now check below steps to see how this tool really works.
  1. Download h2testw.zip file.
  2. Now extract the downloaded tool and you will get the .exe file.
  3. Now double click on it and start this tool.
    memory-card-tester
  4. So now just choose the English from top and then click on Select Target, now choose your Pen Drive or Memory Card (make sure its formatted before using this tool.)
  5. Now just click on Write + Verify and then wait for it to complete the whole process, it will take some time according to your drive's size.
  6. Now after its complete it will show you message like complete without any errors, if you find no errors then your drive is good.
  7. But if you find errors then your drive is fake or has some problems.
That's it now you can easily check any drive, so this tool will surely help you and your friends, do comment if you find any problem :)

Saturday, September 21, 2013

3 Tools to Check and Test USB Flash Drive

One of my friends came up to me a little while back and asked me if I was interested in buying some USB flash drives from him. He had about 200 pieces, they are all new and are about 60% below the current market price. It’s a very good deal when you can buy a $20 new USB flash drive for only $8. He couldn’t reveal how or where he got it from and that alone got me a little worried about the quality of the USB flash drives. He also told me that there won’t be any warranty if the USB flash drive fails. So I thought that the possibilities are they could be either stolen or are rejected stock from the factory.
The only thing I am afraid of is using a stick for a few times and it couldn’t read the files or can’t detect the drive anymore. I have also heard several stories of people buying USB flash drives from places like eBay and their true capacity being only a fraction of what was advertised. So, with all this in mind, I told him that I’d like to test the USB flash drives first before buying and he agreed. Windows comes with scandisk or chkdsk which I can use to scan for bad sectors but it lacks any soft of burn-in test or a test to check the true capacity. So here are 3 tools you can use to test the current condition and performance of a USB flash drive.

1. Check Flash
Check Flash (ChkFlsh) is a very simple flash drive testing and maintaining tool. I have used this tool several times to run a burn in read and write test on USB drives. If the device is able to survive after a few cycles, the USB flash drive should be OK. There are 3 access types and 6 action types for you to select. To access the actions of “Read stability test”, “Save image”, “Load image” and “Full erase” you have to change the Access type from temporary file to a logical or physical drive.
Check Flash drive
Other than checking for drive errors, it can also determine the read and write speed. The test length can be set to scan the drive just once, several specified passes, or leave it running until an error is found, or you tell it to stop. Check Flash is a free and single portable executable file. It can only test USB flash drive and not external hard drives.

2. RMPrepUSB
RMPrepUSB is a tool which is actually a USB formatting, partitioning and bootloader creation utility as opposed to a USB testing tool. While it’s not meant to be useful for doing a complete read and write scan, it does have a little function that can test your drive to see if there are missing or bad parts and what the actual usable size is. This is ideal to check if the drive is the capacity you believe it to be and is infinitely quicker than scanning the whole drive if that’s all you want to do.
RMPrepUSB
Make sure the USB drive IS EMPTY because any contents will be deleted. Simply insert your drive and select the “Quick size test”. Portable and installable versions are available. This is also quite a good tool to experiment with bootloaders on your flash drive as there are several different types that can be used.

3. H2testw
H2testw is able to test USB flash drives, memory cards and also internal, external and even network hard drives for errors. It simply works by filling the device with 1GB chunks of test data and then verifies it by reading the data back again. Usage is very simple. Select the English language because it defaults to German, select the target device, and then choose whether you want to test all available space or a specified amount of Megabytes.
H2testw
Although H2testw is non destructive in that it won’t overwrite anything present on the drive, for best results, it’s recommended to have an empty and newly formatted device. This program has been found to be very good at testing both for errors and to find USB sticks with a fake capacity. H2testw is also a completely portable standalone executable.

Saturday, August 10, 2013

Online Error Generating Service Creates Funny Fake Pop-Ups

Online Error Generator can help you to make amazing windows styled errors online which can help you in pranking out of your friends. This online service can be configured the way you want with its really simple options. Now the error will look similar to what you can see on the right, but off-course you have the ability to make a whole lot of changes to this thing, like you can add your own title and your message and you can even change the button text for more spooky effect. So there are many possibilities, so for now on just check out how you can use this service.

  1. Visit Error Generator Website
  2. Now you will see all the options which you can customize according to your error button needs name, website, icon and all the rest things.
  3. So check all the options and after that click on Generate Error Button and you will get your error link which you can share with your innocent friends and as soon as he opens that link he will get that error and boom, work is done.
  4. But still one step is left to make this link more genuine just shorten this link up with any good shortening service like bit.ly, goo.gl or any good one you like so that this real link is masked out and your friend does not assume it as spooky.
Well there are few more options if you wanna go for like Kirsle Error Message Generator &Smasher Error Message Generator, I even heard about some windows tools that can be used to create errors, if you know some good ones do comment below so that I can update this post, have fun and do prank your friends.

Boost Download Speed on Android with IDM Free Download

IDM do not need any kind of special introduction as its is the most renowned download manager for Windows pc. It usually boost up your download speed by 3 times by enabling multiple connection all at once. It even comes with the resuming capability that makes it much more appropriate option for those who have a bad Internet connection. Well I even posted about IDM optimizer that could boost your IDM speeds by some percentage too. But now we are talking about IDM for Android yes that’s right now you can boost your download speeds on Android too by using this awesome download manager application.

Well using IDM for Android you are getting all those same features you were getting for Windows PC, so now 3 times faster downloads on your android device using this simple and small application. So now check below steps on how to install this simple application and use it out.
  1. Download IDM-Android.apk
  2. Now transfer this application to your Android device and Install it.
  3. Now you can easily open the app and paste the download link and press Download or if you are on any webpage you can long hold that link and choose Share link option, now press Download using IDM.
  4. So now enjoy faster download speed’s with this simple IDM Application.
Well this application is still in testing zone, so if you face any problem using this app just ignore it and restart the app and start again, have fun and enjoy. If you like this application do share this post with all your friends by linking it below and do +1 too.

How to Change Background Image for Facebook Login Page

fb-refresh-extension
Facebook is currently the biggest online ada where people join and translate each others thoughts and communicate in many different ways by chatting, sending emoticons and sharing images, well now to make some more adjustments we have found an interesting and easy way for changing your Facebook’s login page background image. We tried to do it and applied interesting abstract flower image which you can check below.
Now as you can see in the above image we have changed the background image and style of Facebook Login Page, well now I just applied some random abstract image, you can go with any one applying your personal or with friends image on the background. So now when ever any one opens Facebook.com on your PC if will be greeted by that image with options to Log-In on Facebook. So now lets see how this can be done.
  1. fb-refresh-extension
    Make sure chrome is installed now install the FB Refresh Extension.
  2. After you have installed the extension now just head over to Facebook.com and you will see that page in a new way something like above but obviously not that image, so now you have to click on the small gear icon above the Log In button.
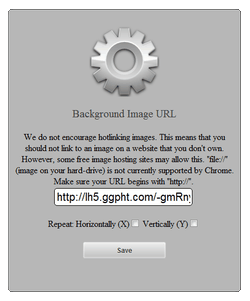
  3. Now after you click on the small Gear Icon you will see window like above asking you to insert the image URL for the image you wanna use for the background (If you wanted to use the same image we have used in the above demo image than you can grab the link here)
  4. Now you can choose if you wanna repeat the image and in which direction X for Horizontal and Y for Vertical and than just click on Save Boom, now just navigate to Facebook.com and enjoy the new fresh background.

Scan Facebook Profile for Viruses using Bitdefender Safego

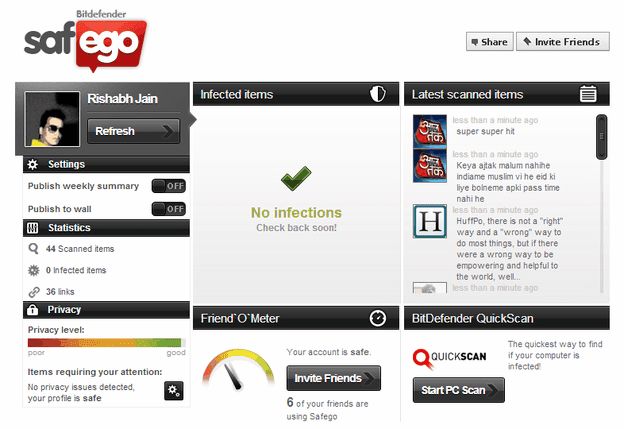
Bitdefender is regarded as the renowned brand in online security from Simple Antivirus protection to Total PC security, yes you can reply on this brand for optimum security levels. Well so recently I just installed windows and I gave a try to their free version antivirus, well let me tell you that its really awesome, its simple, fast and really working model, so basically you need to login in order to activate it so when I was activating I came across my dashboard *created free account and I saw many more products in which one was Safego that allows anyone to scan their Facebook profile for viruses and harmful stuff for free.
bitdefender-safego
So I just got attracted towards it and I connected my Facebook account with it, well you just need to give access to its app so that it can access your feed and wall and scan it up. So it started scanning my profile, my newsfeed and everything, the report is right above in front of you, well luckily my profile was not poisoned up so I went safe, but maybe your profile can have few viruses or other stuff that might post some bad content from your account to your friends like the scandal happened earlier, so its better to stay safe and use Safego as it automatically removes any harmful stuff and makes your profile clean and green.

Safego Friendly Advice Feature

Safego even provides you with the friendly advice feature with Warn Friends option so if fishy and bad links are posted on their newsfeed then you can warn them too about that so that they can remove that link and make their profile clean too.

On Post Scanning Feature

Now surf newsfeed and even socialize without any worries as Safego scans everything in just 60 seconds interval thanks to their improved scanning technology.
So overall I think it’s a good and easy option to scan your Facebook account for malicious links or spammy stuff without installing anything. So visit Safego now and create a free account and install their FB app to scan your Facebook profile.

Uninstall Software's Completely & Remove every Trace

revo-uninstaller

When ever we install software's on our PC or Mac or any other OS we usually add many folder’s, registry entries and much more that are not known to you but are installed secretly by every software for maybe its working or other things. So at the time you are uninstalling that software you are just doing a part work, you still have traces of that software all around your PC, well uninstalling them manually can be done but it will take some technical skills, well to overcome this problem we have a very nice solution called Revo-Uninstaller that proves to be the best Uninstaller you could ever get for your machine.
So basically what Revo-Uninstaller does is it scans your system’s drive, registry editor and other places for the left overs of the software you have just installed. So from the time you execute Revo-Uninstaller you will see how fast it just removes every thing from your computer and makes your computer clean.

Revo-Uninstaller Free & Pro Version

Well Revo-Uninstaller has two version one for the non paying client and another one for the clients who do not comprise with optimum solutions, well yes there is a huge difference between free and pro version , but if you are just thinking to give a try to Revo-Uninstaller well freeware version will work perfect as I used it up and it worked like a charm. So in the free version you get advanced mode scanning function that scans for left overs deeply and you even get 8 other tools for more optimum cleaning process.
But if you compare the paid version with this free one well you will find the other one has so many awesome features like real time tracking of software’s are bring installed and where its files are being pasted up, so that at the time of removing that software from your PC it can much more easier and convenient. You can also do multiple install’s and uninstalls. So now lets jump in to see how you can install the free version and use it to remove your system’s unwanted software's.

Installing Revo-Uninstaller on Windows

Well installing Revo-Uninstaller is a simple task as you just need to download the software from the manufactures website and run its file, but Revo-Uninstaller provides you two version in free option, standalone installer and portable version.Well I will recommend that you should install portable version as its more convenient to be used.
  1. Download Revo-Uninstaller Portable Version [Link]
  2. Now just extract the package using WinRAR or other software.
  3. Now you will find a .exe file double click it up.
  4. This file will create two more files so that’s not a problem.
  5. Now you will see window like above showing you all the software’s installed on your machine, well now just right click on the one you wanna uninstall.
  6. Now it will ask you, if you really wanna uninstall that software just click on Yes and follow the steps, you will get some windows asking you the more just choose Advanced mode that scans more deeply for any leftover.
  7. Now it will scan the registry, just mark the entries and delete them up, well that’s it. So for full using information just check out the below video.

Saturday, June 15, 2013

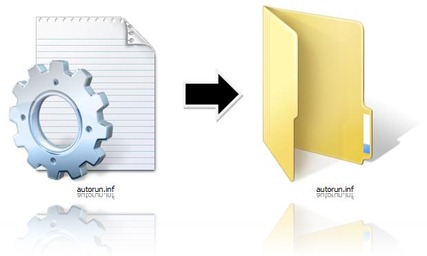
How to Remove Autorun.inf Viruses from PC


To remove Auto-run Virus Follow these simple steps:


A. Using CMD:
1: Open Command Prompt.
2: Now in Command Prompt, Type “cd\” and press enter to get to the Root Directory of C:\ .
3: Now Type “attrib -h -r -s autorun.inf” and press enter.
4: Now Type “del autorun.inf” and press enter.
5: Now repeat the same procedure with other drives, type “F:” and do the same thing and with our drives.
6: Finally Restart your Computer.


B. Manually Deleting Virus Files:
1: Open My Computer and from the top menu go to Tools –> Folder Options.
2: Now go to View tab and check the option Show hidden files and folders and uncheck the option Hide protected Operating system files, then click Ok. Apply it and Click on Ok.
3: Now open your drives (By right click and select Explore).
4: Delete autorun.inf and MS32DLL.dll.vbs or MS32DLL.dll (use Shift+Delete as it deletes files forever.) from all drives.
5: Now go to C:\WINDOWS and delete MS32DLL.dll.vbs or MS32DLL.dll (Use Shift+Delete ).
6: Now go to start –> Run –> Regedit and press Enter.
7: Now navigate from the left pane as: HKEY_LOCAL_MACHINE –> Software –> Microsoft –> Windows –> Current Version –> Run. Now delete the entry MS32DLL (Use Delete key on keyboard)
8: Now open Group policy editor by typing “gpedit.msc” in Start –> run and pressing enter.
9: Go to User Configuration –> Administrative Templates –> System . Double Click on entry Turn Off Autoplay then do as follows:
  • Select Enabled
  • Select All drives
  • Click OK
10: Now go to start –> Run and type msconfig and press Enter. Go to startup tab in it and uncheck MS32DLL. Now click Ok (when the system configuration utility asks for restart ,click on exit without restart.)
11: Now restart your PC once and you can now open your hard disk drives by double clicking on them.


C. By Autorun Virus Remover:
Autorun Virus Remover is not a common product like other antivirus products in the market, it focus on solving the autorun virus problem completely.
  • Remove 2000+ types of autorun viruses permanently, easily and quickly
  • Prevent any viruses from infecting PC via USB drive
  • Recover hidden files and folders on root of hard disk and USB drive
  • Fix system, registry errors caused by viruses

Saturday, June 1, 2013

Saturday, May 11, 2013

Blur Name's, Links & Pics in Facebook Status Automatically


Sometimes you find some really useful that you want it to be shared on your blog or somewhere on the internet but as privacy matter's alot , its an important step that you hide all the name's and pics mentioned in that status update so that no one recognizes who is there or mentioned in that status update. Well normally doing this job is a pretty hard work as you would use a good photo editing software like Adobe Photoshop or some good online editing software that works.
status-snapper-2Well but to make this work much more easier a chrome extension can be I installed, that will automatically hide all the links, names and images from an status update you choose and then automatically upload the screenshot onto good cloud storage service like Imgur.
So as you can see in the image on the right, all the images, links and names are blurred so these are done automatically by just clicking a button, so yes you do that too and then you can share any status update anywhere, as it will maintain a privacy and entertainment.
  1. On Chrome install "Status Snapper" extension.
  2. Now visit Facebook and click on the small icon present in your address bar.
  3. Now it will show "Snap" option on top of every status update.
  4. Now just click on that icon and everything will blurred in that status.
  5. If you want to un-blur anything just hove on that thing.
  6. After you have made that anonymous, just press Finish option and it will start capturing that image and then it will upload that image automatically.

Saturday, April 27, 2013

Control Mouse Movements using Awesome Body Gesture's


Have you ever wondered to convert your desktop or laptop into that Kinect kind of thing you saw for those Microsoft consoles, well now you can give a pinch of that same thing to your mouse control by moving it using your body gestures.

Camera Mouse is an innovative tool that can easily move your mouse cursors by just using your body gesture's it like tagging something and using your webcam to track that thing and when it moves it simply moves your mouse.
So you do not need any additional hardware setup to do this thing just a webcam installed will work perfect. Now what's the use about this tool well as mentioned on their official website CameraMouse.org its really a good tool for people with some disabilities or for anyone having problem to navigate the mouse with their hands just fix a spot and you are ready to rock and roll.
camera-mouse-settings
This little tool even comes with bunch of settings you can tweak out for more awesome and comfortable experience. You can choose the clicking option that will allow you to click anything within in a time period, so everything is configurable using their settings panel.

So now just check out below steps on how to download this tool and use this on your PC or laptop and get an awesome wireless Kinect experience right away.
  1. Download CameraMouse [Link]
  2. Now extract the .zip package and you will get a .exe setup, double click it.
  3. Now just follow steps and install this software on your PC.
  4. Now you will get a green rectangle icon on your desktop double click it and you will have this tool running.
  5. Now you will see your webcam running and your face would be visible.
  6. Now just use your mouse to click on any part of your face or body to track.
  7. Now a green rectangle would be marked on that place.
  8. Now it will start moving as you move and now you will see your mouse moving as your part move's that's it.
  9. Now you can easily click on any part and enjoy mouse movements with gesture's.
  10. Now to use click's just open settings and under clicking Tick Mark it.
  11. Now choose settings and when ever you want a click just wait for that seconds and mouse will automatically click on that place.
So that's it now you can easily use your body parts to get mouse movements, if you face any problem's do comment below and if you like this post do share it with all your friends.

Friday, April 19, 2013

Magically Remove Elements From Your Photos!


Aside from the information we truly want to see on our photographs, there are also many not so crucial for composition if not worse. These are camera date stamps, watermarks placed by various websites, and other objects we don’t want to be on a picture. After all, if you gonna hang a photo on a wall, you want it to look eye-catching not due to various visual wreckage on it. So remove it with Inpaint! With simple and efficient tools you are able to remove any unwanted elements totally effortlessly.

The devil is always in details. A tiny object on a photo can ruin the entire composition or even make it produce the effect opposite to that you initially were hoping for. Using Inpaint removing objects from photos is almost as easy as taking a shot itself. With merely three simple steps you can make power lines, tourists, buildings, background wreckage and other elements vanish as if they never were there

Old doesn’t always mean bad. Some older photos we have are still important to us as they still carry value and bring positive emotions. Alas, scratches, spots and tears are an inevitable legacy of the old film photography, especially if we talking about aged pictures. Happily the digital copy of a scanned old photo can be easily retouched with Inpaint. This little yet capable helper will make all those frustrating defects go away with minimum efforts from your side. Just select problematic zones on the picture and fix them!

Nobody is ideal. Yet still we want to look better sometimes – retouch some wrinkles, remove skin defects. Indeed, what a wedding photo would bear redness or pimples on the bride’s face? What about prom album or a dating site? Inpaint allows you to quickly improve your skin on photos and conceal everything you don’t want to show. Just apply the Marker tool or the Magic Want tool to every problem zone and instantly see the difference!


Tuesday, April 16, 2013

Top 10 Facebook Userscript Hacks


UPDATE This is an old post that has been modified with new links and text, so few userscripts may or may not work according to recent facebook privacy changes :)
Userscripts have taken our entire online experience to a new level, with userscripts we can easily add any kind of JavaScript activity to our online service's like I posted YouTube Center Script that enhances the YouTube experience by providing you various playback options and much more, so today I will be posting 10 great userscript hacks that will allow you to modify your facebook experience.
So using these userscripts I have posted below you will be able to view albums, change your facebook layout and much more so jump in and lets get started.


  1. View Private Albums - well you can easily view private albums of any person if he or she is not your friend too, well just install this userscript [Link] and see links to original image to their albums.
  2. Remove Facebook Advertisements - facebook cleaner is another good userscript that simply allows you to remove that bad sponsored and advertisement area from facebook so to do that just install this userscript [Link] and see them vanished away.
  3. Redirect Real Profile's - normally when searching about any person you come across your public pages, well using this userscript [Link] you can get redirected to real people's profile, well make sure that you are logged in to facebook for avoiding infinite loop's.
  4. Undo Facebook Changes - facebook always come's with something special and unique but everyone does not accept those changes, so if you are one of them then this simple userscript [Link] will allow you to undo an facebook change by choosing at what level you want to undo at, so its really a good hack.
  5. Viewing all Photo's - well sometimes you may try to view every photo related to that person, well you can not do that if that person has some tight privacy settings or something by using this easy userscript [Link] you can do that.
  6. Find More New Friends - sometimes your known friends join facebook but you do not know about that thing, well using this official facebook feature [Link] you can find them by checking your friends list.
  7. Sharing File from Facebook - well are wondering how to share file's from facebook well these 30 apps [Link] will allow you to desktop share anything using Facebook.
  8. Get Job from Facebook - well if you are a facebook addict then this could be the easiest way to get job on facebook as this apps [Link] include easy job opportunities and other stuff for you.
  9. Tighten Privacy on Facebook - well if you consider a good privacy plan for your facebook profile then these privacy checking tool's [Link] will allow you to check your online facebook privacy and will tell you what to tighten up for more optimum level of facebook experience.
  10. Cheat Facebook Texas Poker - well using this simple tool [Link] you can see cards of any player's and hence you could cheat out virtually.

Sunday, April 14, 2013

How to Block Facebook.com on any Computer

Well Facebook has just evolved the way people used to chat with each other, in-fact children are now adding, interacting and chatting with their friends online, well this is good habit has it evolves really a big knowledge circulation but side by side its becoming an addiction so its must that every parent knows how to block it when ever they want too.

facebook-blocker-utility
So now this utility work is pretty simple, you just need to open this utility and choose any option to start your operation with, so now you can follow below steps to see how it works.
  1. Download FB Blocker Utility.
  2. Now just extract the .exe file from the .zip package.
  3. Now double click on that utility and you will see something like above.
  4. Now press 1 Key to take backup of your hosts file.
  5. Now press 2 Key to block Facebook.com
  6. Now your facebook would be blocked to check if its really blocked just press 5 Key.
  7. Now you will not be able to browse Facebook.com
  8. Now anytime you want to unblock the Facebook.com.
  9. Open this utility and press 3 Key that's it.
So that it it's the easiest way to block and unblock Facebook.com, well if you find any problems using this utility do comment below so that I can help you out.

Wednesday, March 27, 2013

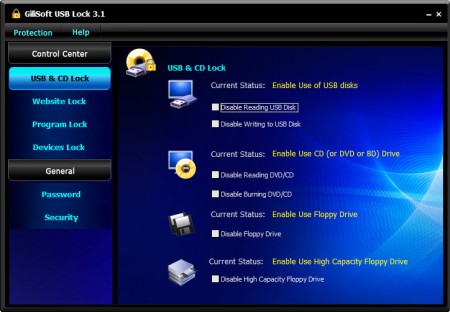
Gilisoft USB LOCK 3.1.0 Full


GiliSoft USB Lock is a data leak prevention tool that prevents leakage and copy of your data to USB Drives, External Drives, CDs/DVDs or other such portable devices. Once installed, USB Lock lets you block all such drives and devices that do not belong to you. With USB Lock, you can share your PC with anyone without fear of data theft.This is an easy and powerfull Endpoint DLP Suite that helps you to lock usb port,make dvd/cd burner read-only,block some websites,forbid some programs and disable more devices.

• Block USB Drives:
Disable reading from USB disks or disable writing to USB disks.USB Lock doesn’t allow any type of USB drive to access your computer unless you authorize it. By default, all types of USB drives are blocked including external drives, FireWire, Enhanced mini-USB, Host Controller Interface (HCI), HP-IL, Com, LPT, IrDA, USB on-the-go, U3, EHCI, RAID Controller, Host adapter, Serial Cable (use with data transfer), Serial ATA, ACCESS.bus and any storage device that is attached to USB port showing a drive in the system.

•CD Lock,Block Media & Blu-ray Discs:
Disable reading from DVD/CD discs or making DVD/CD burner read-only.The application also blocks any disc that uses the disk hub, bay, combo or CD/DVD drive and allots a drive letter, for example; CD-R, CD-RW, CD-RAM, DVD-R, DVD-RW, DVD-RAM, HD-R, HD-RW, HD-RAM, Blu Ray-R, Blu Ray-RW, Blu Ray-RAM, Floppy Disk A, Floppy Disk B and Zip Drives.

•Website Lock
Block accessing some websites. This utility allows you to block unwanted websites from display in Internet Explorer. If a website is blocked the user is forwarded to a blank page or to a "blocked page" and the contents of the original page are not loaded on your PC. Stop loading banners and ads, stop your kids from spending hours in chat rooms or remove undesired websites from their view. Prevent your children from having access to certain websites content such as adult sites and gambling.

•Programs Lock :
Block running any programs, including IE, Outlook, AOL, AIM, and more. You can even lock your control panel with one button click. Other features include the ability to choose your own message to display if anyone attempts to run one of your locked programs, and also includes password protection so only you can unlock the program when you are ready to use it. Allows the entire computer to remain active and running, and it only locks and prevents access to the programs that you specify. Easy to use interface shows you current status of all locked programs, and allows you to easily click and unlock as you wish

• Devices Lock:
The program can be used to restrict read or write access to removable media devices such as CD, DVD, floppy, flash and USB drives.It also can be used to disable printer,moderm,com lpt ports,infrared,bluetooth,1394 ports.

• Alarm Notification :
If user enters wrong password more than 5 times,it will send alarm notifications to your e-mail .

• Copy Protection:
The program uses an advanced level of data leak prevention technology that does not permit duplication of your important files and copyright material to any USB drive or other such storage devices without your permission. The program works by blocking all types of unauthorized storage devices like USB drives, external drives, CDs, DVDs, etc., in this way it prevents plagiarism, piracy, illegal distribution and copying of your data

•Data Leak Prevention:
USB Lock is a data leak prevention software. It prevents your data from getting leaked out to USB drives and other such storage devices by letting you control which device can access your computer while blocking all other unauthorized devices that do not belong to you. With USB Lock installed on your computer, you can feel safe that your data will remain on your PC safe and secure.

•System Compatible
Windows 2000/2003/XP/Vista/Windows 7/8 (32&64)

Installation Note: 1. Please turn off your Antivirus because most of Antivirus detected Keygen as a virus but it’s safe.
2. Install the soft normally.
3. Use the Keygen for generate a key and use it.
4. Enjoy the full Soft.
5. Support the companies, which software you actually enjoy.  

Password - hackkit

Connect with us on Facebook :)

By. HackingUniversity Get this Widget :)